How to Burn ISO to DVD on Windows &Mac (Easy Ways)
- Karen Nelson
- 24/06/2023

DVD Creator
"I'm having an issue here. I inserted a home movie with .iso format into my DVD player but shows, "Cannot play this type of disk". So what can I do with this? Does anyone know how to burn an iso file to DVD and make it playable on my home DVD player?"
You may find that some movies you downloaded on the internet are saved in ISO format and not playable on all DVD players. The most common way to solve this issue is to burn ISO files to a DVD, which makes the ISO files supported by Windows/Mac and most DVD players. But how?
Actually, both Mac & Windows offer built-in features to burn an ISO file to a DVD, and it's easy to follow. Detailed guide will be introduced in the post. However, the built-in features have limited functions to burn ISO files to DVD, and may not meet your needs if you want to burn your own videos to DVD. So, we'd like to recommend you a third party to help you create personalized DVDs with local files on your Windows and Mac computers. Just keep reading!
Recommendation: Burn Videos to DVD on PC/Mac with the Best DVD Burner
Although Windows and Mac have built-in DVD-burning functions for sure, they only provide basic burning functions. But what if you want to burn other common media videos to DVD, like MP4 to DVD, WMV to DVD, iMovie to DVD, or even YouTube videos to DVD, you may need a professional tool.
VideoByte DVD Creator is one of the fastest, most efficient, and most reliable software for burning DVD/Blu-ray discs and folders on Windows & Mac in the market. It allows converting any videos to DVD in high quality. No matter whether you are a techie or a novice, the program is easy to use. The key features that come packed with the software include:
- This DVD Creator can convert almost all popular video formats including AVI, MPEG, 3GP, MP4, VOB, FLV, M2TS, MTS, MOV, RMVB, DivX, DV, etc. to DVD disc/folder/ISO files.
- It allows you to create videos to Blu-ray disc/folder/ISO file, like converting MKV videos to ISO on Mac/Windows.
- With this program, homemade movies or videos downloaded from YouTube, Vimeo, Facebook, Dailymotion, Vevo, TED, Yahoo, etc. can be burned into DVD or Blu-ray on Windows.
- The 3D video, high-definition (720p, 1080p, and 4K) video, and music are allowed to download for any player.
- It has a wide variety of DVD menu templates and a powerful video editing feature.
- It allows you to add subtitles and audio tracks to your DVD manually.
How to Burn DVD on Windows & Mac with VideoByte DVD Creator
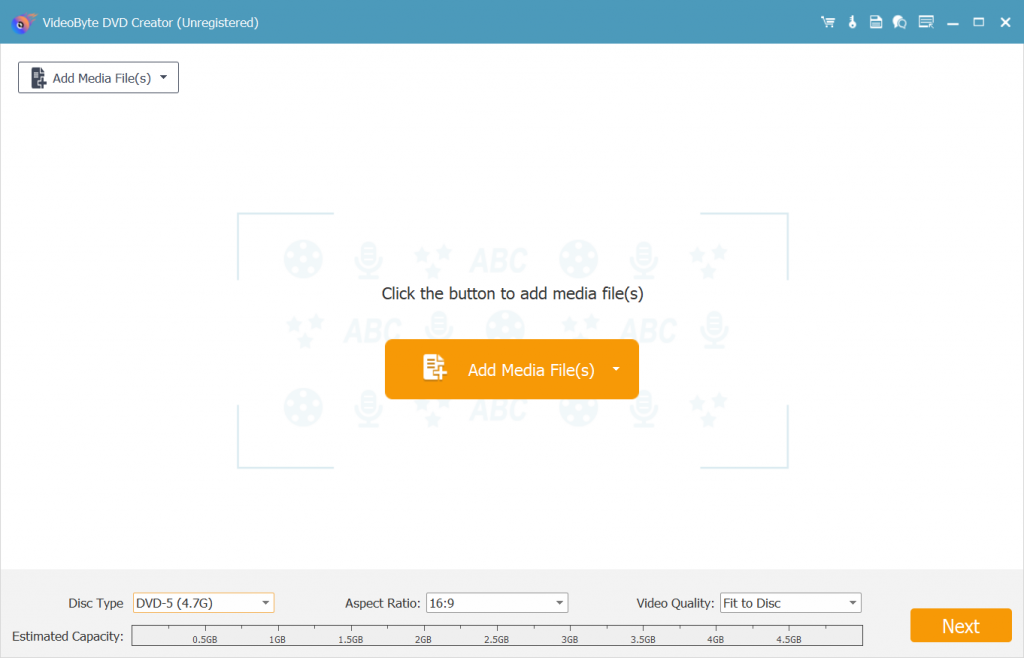
Step 1. Add Files to Burn
After launching this DVD-burning software, you can see brief instructions offered on the main interface. Directly drag and drop the media files you want to burn into VideoByte DVD Creator for preparation.
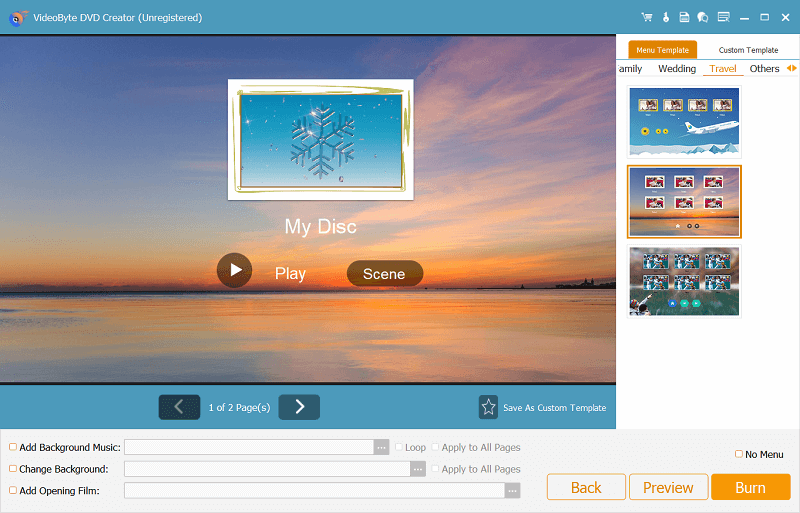
Step 2. Create a DVD Menu(Optional)
For better navigation, you can create a unique menu for the DVD with abundant menu templates before burning. Also, it allows you to add background music and images to perfect your DVD menu.
Step 3. Insert a Blank DVD
Videobyte DVD Creator provides file editing services as well. Please be free to edit your burning files with ease. Then, insert a blank DVD that is playable on any DVD player.
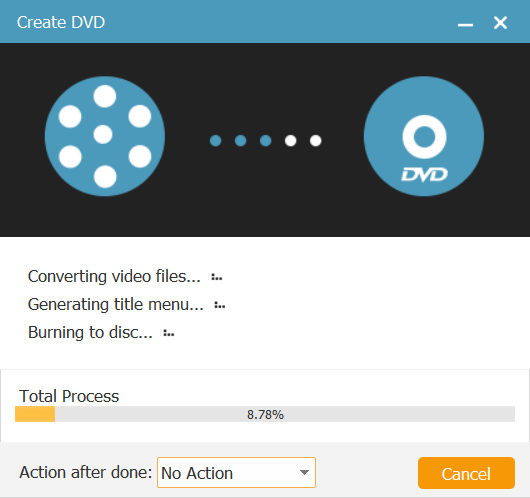
Step 4. Start Burning a DVD on Windows/Mac
if you are happy with the output settings so far, you can click the Burn button to activate the burning process of the DVD. Monitor the burning remaining on the pop-up window. The burning remaining time mainly depends on the project size. Once it is finished, you can play any media file on any DVD Player via a DVD.
Burn ISO to DVD on Windows 11/10/8/7 with Built-in Tool
For Windows users, File Explorer can serve as a free ISO to DVD-burning software. You can directly use File Explorer to burn ISO files to DVD with easy steps and make a bootable DVD from ISO files on Windows 11/10/8/7. Next, a detailed tutorial will be provided for you to follow step by step.
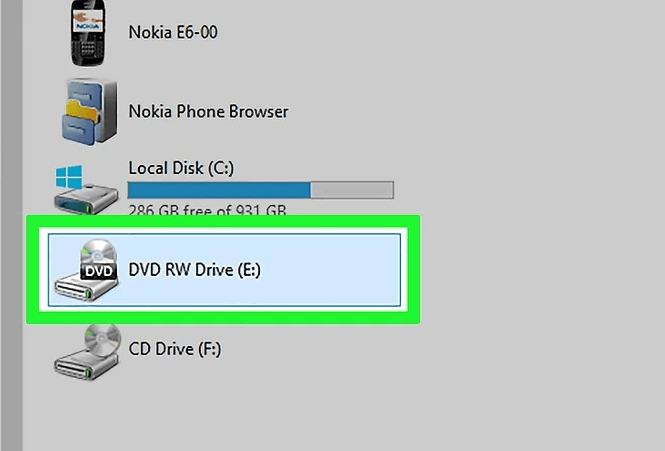
Step 1. First and foremost is ensuring that your computer has a disc drive that can burn. You will need a DVD drive to burn your ISO file to DVD. Most current Windows computers are equipped with a DVD drive.
- If you can find "DVD" engraved on CD tray or near it, it means that the DVDs can be burned on your computer.
- If your computer can't burn DVDs, what you need is to use an external DVD drive for everything else.
Step 2. Next, insert a blank DVD disk into the optical drive. If you want to use this DVD as a system disk or a game disc, make sure that the DVD has never been used before.
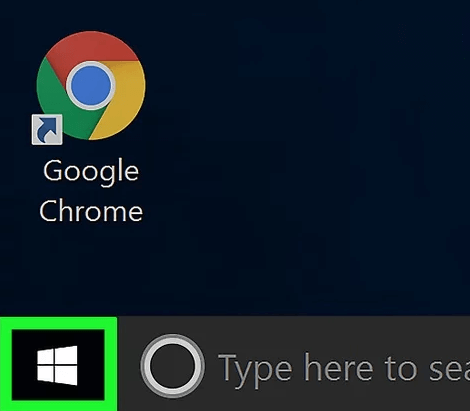
Step 3. Click on the Windows logo in the bottom left-hand corner of the screen.
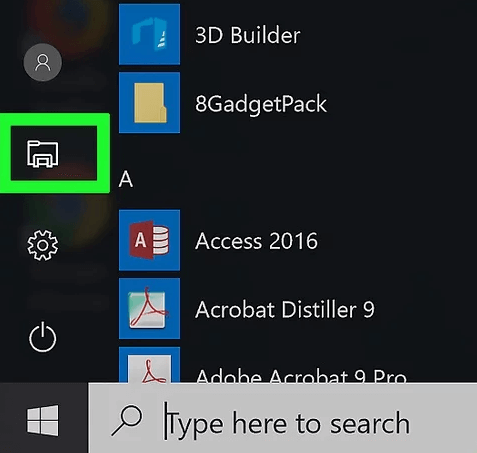
Step 4. Click "File Explorer", a folder-shaped icon in the lower-left side of the Start window.
Step 5. Then, on the left side of the File Explorer window, click the folder in which your ISO file is stored. For example, if your ISO file is stored on your computer's desktop, you need to click Desktop.
Step 6. Select the ISO file which you want to burn.
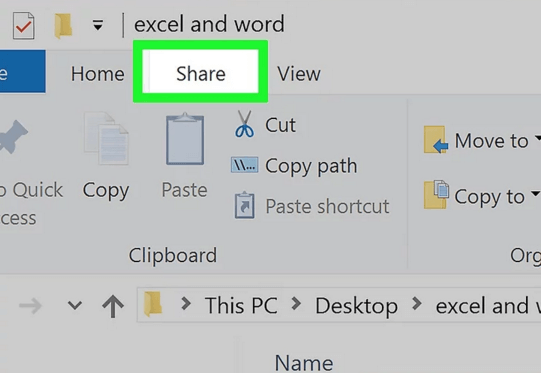
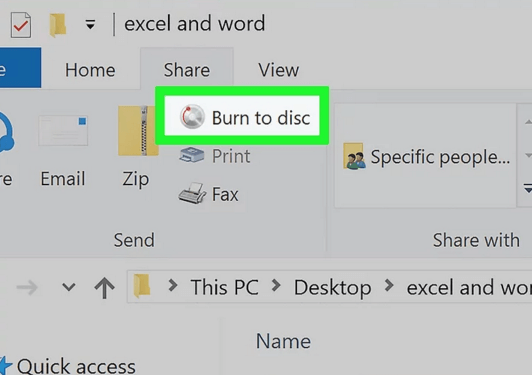
Step 7. Click the "Share" tab on the top left corner of the File Explorer window and a toolbar with some action widgets will present.
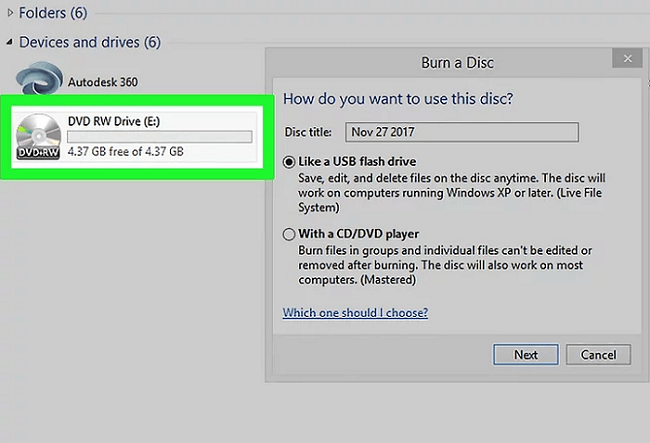
Step 8. Under the toolbar, find the "Burn to disc" option and click, then a pop-up window will appear.
Step 9. If your computer has more than one disc drive, click the "Disc burner" drop-down list and then select the correct DVD drive as the burner.
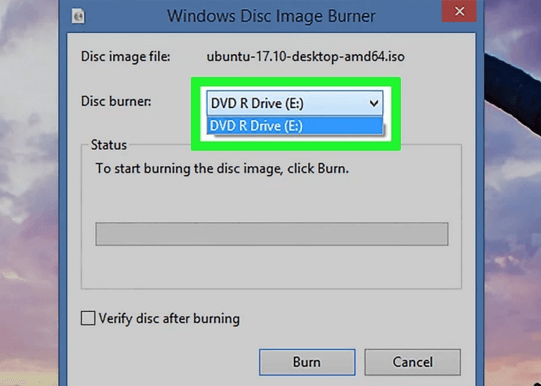
Step 10. Finally, after all of the settings have been applied, just hit the "Burn" button to begin burning the ISO file onto your DVD. Once the process is finished, you can eject the DVD disc and enjoy it. The amount of time this ISO to DVD burning process takes depends on the size of your ISO file's size and the speed of your computer configuration.

Burn ISO to DVD on Mac Without Downloading
There's no exception for Mac users as well. You can use the built-in program, Finder, to burn your favorite movie in ISO to DVD without downloading any extra programs to get help. Moreover, the whole ISO to DVD burning process is free. Next, let's see how to burn ISO files to DVD on Mac.
Step 1. Insert a blank DVD into your Mac's CD slot. Most Macs have no disc slot, so you may need an external DVD reader to simply hook it up to your Mac. All you need to do is connect the DVD reader's cable to your Mac's USB port. When the prompt window pops up, please click on "OK" to move on.
Step 2. Be sure you know where the ISO file is located. To make the burning process simpler, the file could be put somewhere reasonable where you can find it easily (such as the Desktop).
Step 3. Access the search bar by clicking "Spotlight", the magnifying glass icon in the top right corner of the screen.
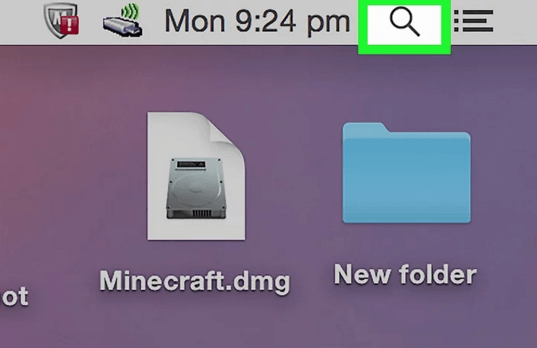
Step 4. Access Applications. > Open "Disk Utility". > Click the radioactive symbol-shaped "Burn" icon at the bottom of the window, then a Finder window will pop up.
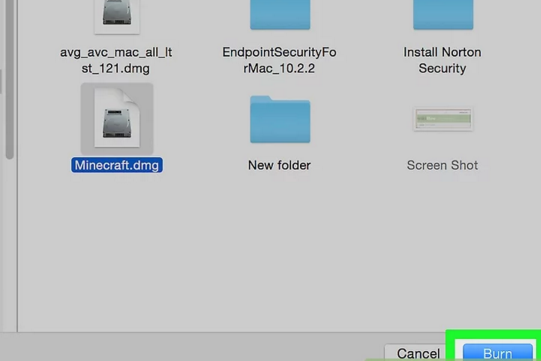
Step 5. From the left side of the Finder window, click the location folder where your ISO file is stored (e.g., Desktop), then select the ISO file which you want to burn.
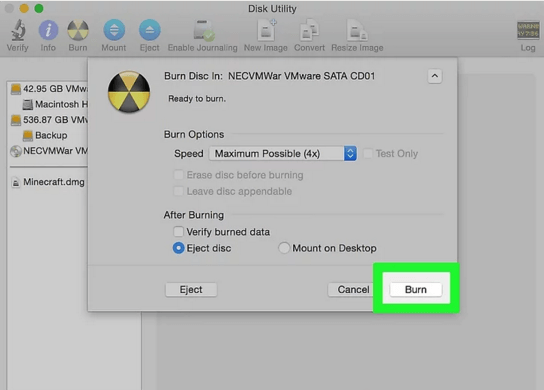
Step 6. Next, click the "Burn" button in the bottom-right corner of the window and the Finder window will close.
Step 7. To begin burning ISO to DVD on Mac, just click the "Burn" option in the drop-down window at the top of the Disk Utility window.
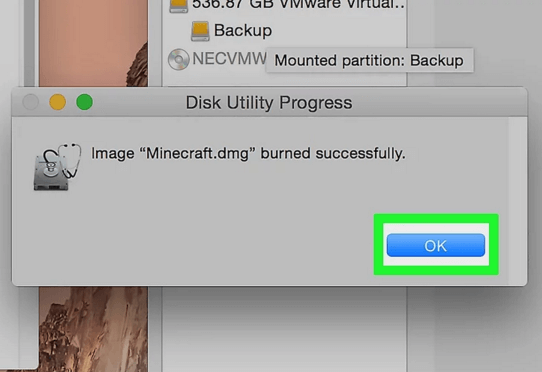
Step 8. After the ISO to DVD burning process is done, hit the "OK" button in a pop-up completion window.
FAQs of ISO to DVD
1. What is ISO File?
Anybody who has downloaded movies or games from the internet will often find them coming in the form of an ISO image file. An ISO image is an archive file of an optical disc, a type of disk image composed of the data contents from every written sector on an optical disc, including the optical disc file system. ISO image files usually have a file extension of .iso. The name ISO is taken from the ISO 9660 file system used with CD-ROM media, but what is known as an ISO image might also contain a UDF (ISO/IEC 13346) file system (commonly used by DVDs and Blu-ray Discs).
ISO images can be created from optical discs by disk imaging software, from a collection of files by optical disc authoring software, or from a different disk image file by means of conversion. Software distributed on bootable discs is often available for download in ISO image format. And like any other ISO image, it may be written on an optical disc such as a CD or DVD.
2. Is There Useful ISO to DVD Freeware?
Sure. You can easily find a wide range of free ISO to DVD burning software for Windows &Mac on the Internet. And they are different from the burning services that come with Windows and Mac. These free ISO to DVD burners not only support burning Data DVDs but also support burning Video DVDs. This means you can play ISO video files directly on DVD players, which is not possible on Data DVD.
Then, some well-known ISO to DVD freeware, such as Burn, LiquidCD, and Virtual CloneDrive, can meet your needs.
- Burn - A free DVD/CD burning software allows users to burn an ISO file to DVD on Mac for free. No complicated operation is needed. All beginners can master how to burn ISO to Mac quickly.
- Virtual CloneDrive - An extremely easy-to-use ISO to DVD Burner on Windows. It is simple but professional, helping users to convert and burn ISO images to a DVD or CD.
- ImgBurn - A freeware that offers basic DVD-burning services for users to try on. Just like other ISO-to-DVD freeware, it only requires easy steps to finish burning an ISO file to a DVD on Windows.
What is the Best Solution to Open ISO Files?
Many people choose to burn ISO files to DVD for easy transfer and playback. However, there is actually a better way to access ISO files that don't require ISO to DVD/CD burning - users can actually access the ISO file through a virtual drive on Windows/Mac. However, all computers do not have a built-in mounting function currently, so we need to use some powerful ISO mounting software to get this done. Don't worry, you can easily find a bunch of free ISO Mounters for Windows and Mac online.
Final Words
It is not difficult to solve the issue of how to burn an ISO file to a DVD on Windows and Mac because they come with such kinds of services to help you. However, if you need advanced burning services like making a bootable DVD from ISO files or creating a unique DVD menu, then you may need a more professional DVD burner such as VideoByte DVD Creator, which is well compatible with both Windows and Mac. So why not give it a try?
Hot Articles