Best Blu-ray Audio Ripper to Rip Blu-ray Audio (Ultimate)
- Lafanda
- 28/01/2024

BD-DVD Ripper
Other than the high-quality image quality, the Blu-ray disc also brings fantastic audio effects for people to enjoy Blu-ray movies at home with a cinema-like experience. When you come across some favorite soundtracks from a Blu-ray movie, and want to play them in a continuous loop without skipping through an entire movie, you need a powerful Blu-ray audio ripper to help extract audio from Blu-ray disc without hassle.
To save your time selecting the best Blu-ray audio extractor from so many options online, this article has tested and brought the best option, VideoByte BD-DVD Ripper to you. Now, keep reading and learn how to rip Blu-ray audio easily with this best Blu-ray audio audio ripper by only easy clicks!
You can freely install VideoByte BD-DVD Ripper as preparation here:
Before Ripping Blu-ray Audio: Things You Need to Know
Before heading down to the details of the way to rip audio from Blu-ray, you can firstly get some basic knowledge about Blu-ray audio, which can help you better select a reliable Blu-ray audio ripper meeting your needs. Have a look now.
What Is Blu-ray Audio?
We know that the Blu-ray disc was invented for saving videos and movies in higher video as well as audio quality, so users can enjoy video streaming with a more enjoyable experience. The lossless audio is used for bringing nice sound effects for the Blu-ray disc so-called Blu-ray audio, which can keep soundtracks in uncompressed condition and offers great CD-like quality to provide you the best experience in playing Blu-ray videos with also the best sound effects.
Normally, Blu-ray audio will be created with advanced sound effects like stereo and surround sound, with up to 24 Bit 88.2/96KHZ, making sure that the Blu-ray movies' playback can be performed with the best audio effects. Therefore, while selecting a Blu-ray decrypter to extract audio from high fidelity Blu-ray discs, whether it can save the original Blu-ray audio quality can be quite important. There are actually some free Blu-ray audio rippers available on the Internet, but many of them can’t ensure lossless quality while helping to extract Blu-ray audios from the discs.
Tip: VideoByte BD-DVD Ripper was selected as the best Blu-ray audio extractor of all time with its fast ripping speed, lossless output quality, and multi-functional built-in editors to customize output audio effects. Freely install it to get started immediately!
Blu-ray Audio Formats
In terms of Blu-ray disc compatible audio formats, there include several codes, which include Linear PCM, Dolby Digital, Dolby Digital Plus, Dolby TrueHD, DTS, DTS-HD High-Resolution Audio, and DTS-HD Master Audio. These audio formats are mostly used for movie tracks because movies always need to bring much higher sound effects to people.
Similarly, when you select a common audio format to save Blu-ray audios, you need to consider whether the format can keep uncompressed quality to save Blu-ray audio to provide you with the best playback experience. Like many users would consider to rip Blu-ray audio to FLAC because the format can keep high quality and bring to lossless effects in playing music files.
How to Extract Blu-ray Audio Track with VideoByte BD-DVD Ripper
Knowing the importance of selecting a reliable Blu-ray audio ripper and lossless formats to save extracted Blu-ray audios, now, you may wonder how to find such a reliable tool to help. Don’t worry because we have brought it to you!
Tp rip Blu-ray audios at lossless quality, VideoByte BD-DVD Ripper is surely the best option you should try. This software is widely regarded as the most professional Blu-ray audio ripper, with powerful function designed to extract Blu-ray audios with original sound effects. It offers 300+ popular formats, help you rip audio from Blu-ray to MP3, FLAC, and more according to your needs, including those uncompressed format options. Also, free parameter settings are also provided to let you decide the output quality of each Blu-ray file, making the playback experience completely meet your needs.
Features
- Supports more than 300 video/audio formats, including popular formats like MP4, MP3, FLAC, MKV, and more
- Extracts audio from Blu-ray with 6X faster speed
- Supports to rip audio from both home-made and commercial Blu-ray discs
- Rips DVD or Blu-ray disc at 1:1 quality, including 1080p and 4K
- Add external subtitles and audio tracks easily
- Supports to edit, rotate, add watermarks and other features complied in the powerful toolbox
- Offers user-friendly UI that is easy to use
A Video Tutorial on How to Rip Audio Track from Blu-ray Disc
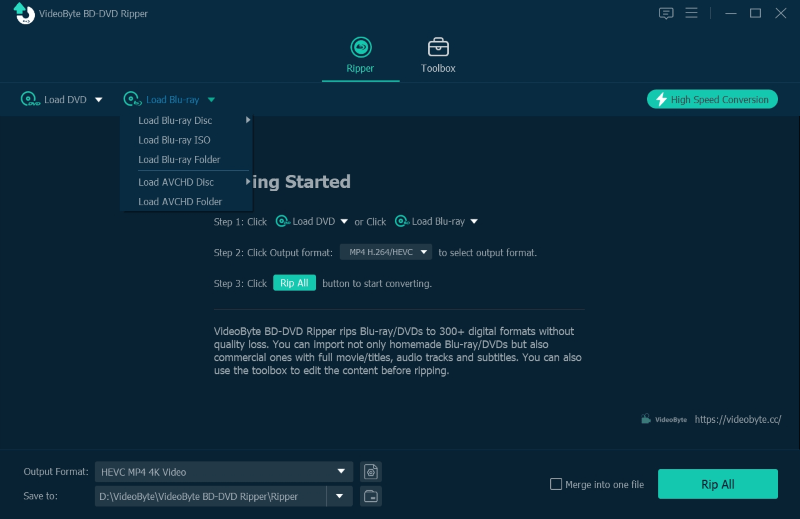
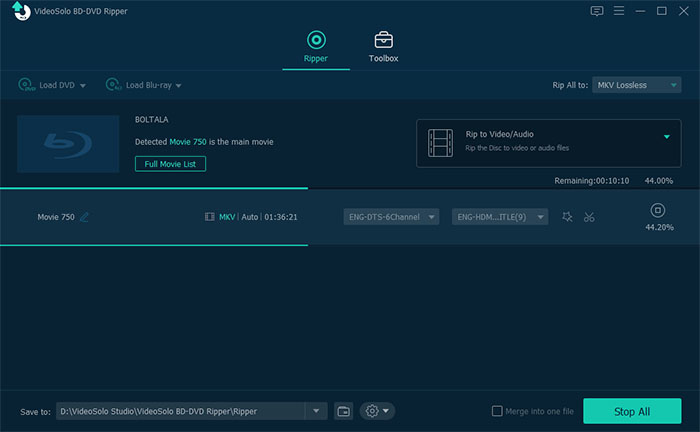
Step 1. Load Blu-ray Disc
Insert your Blu-ray disc to the Blu-ray drive and make sure the computer can read the disc successfully. Click on "Load Blu-ray" button to import the Blu-ray disc content to it. You may wait for a few minutes as this program needs to unlock the copy protection of the Blu-ray disc.
Tips: The process of decrypting the Blu-ray must proceed with a good Internet connection. So please make sure you have a good network before you start the conversion.
Step 2. Select Blu-ray Video
When the Blu-ray disc is loaded in the program, VideoByte BD-DVD Ripper will automatically choose to rip the main movie. You can click "Full Movie List" to select other Blu-ray videos to extract audio from.
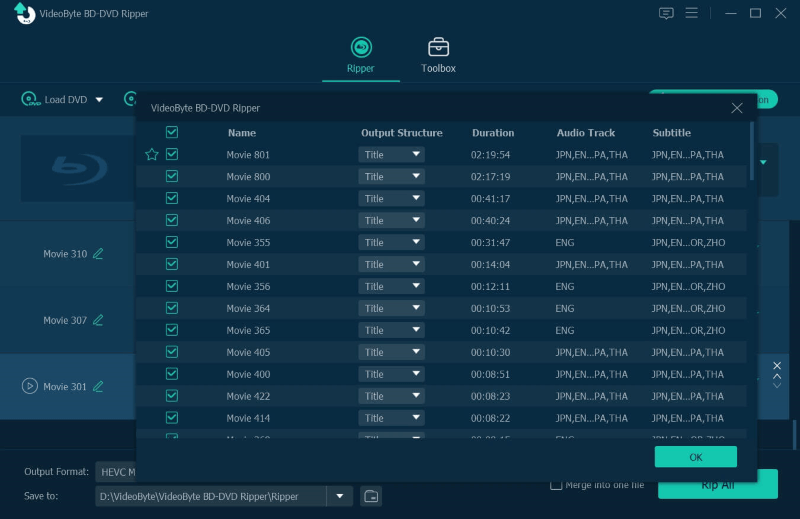
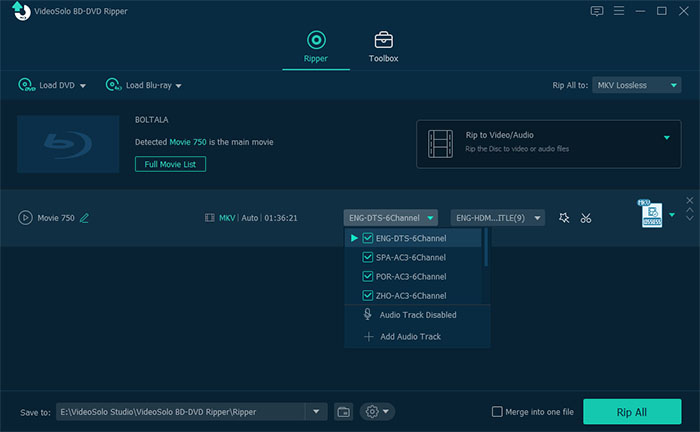
Since we need to rip the Blu-ray to audio, you can also open the audio track list to select the audio tracks that you need.
Step 3. Select Audio Format
Now you can select an audio format for extracting Blu-ray audio. Click the "Rip All to" menu on the top-right corner of the program interface and you can switch to the "Audio" tab to rip Blu-ray audio to FLAC, MP3, or other audio formats as you want. There will also be quality options like the lossless option to help keep ably-ray audio extracted in original quality.
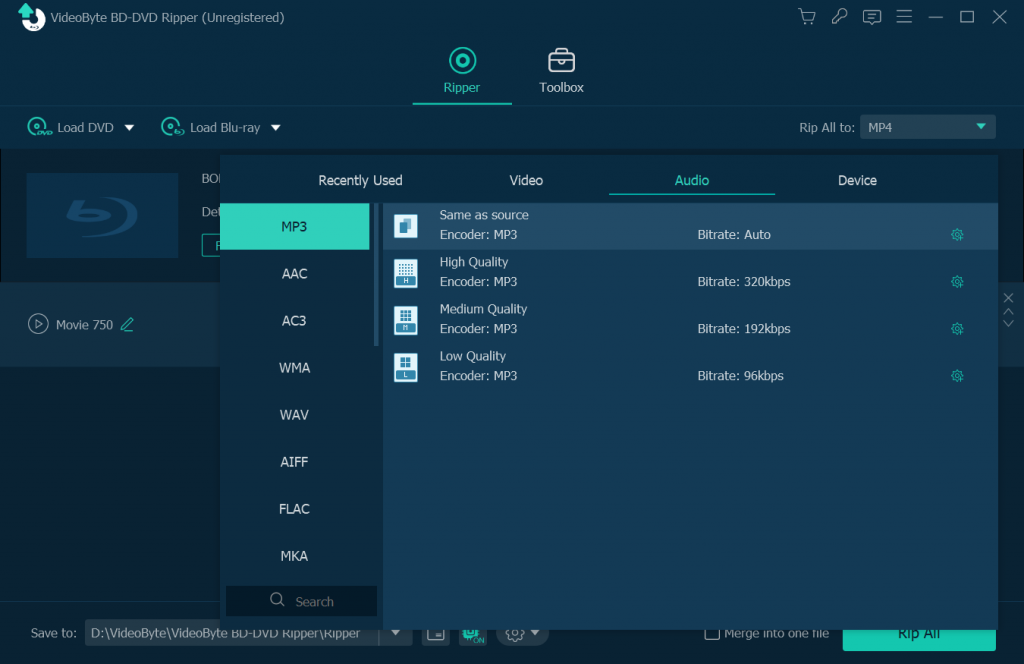
Tips: VideoByte BD-DVD Ripper allows people to change audio specs before extracting from the Blu-ray disc. You just need to go to "Settings" and change parameters such as audio bitrate, sample rate, etc.
Step 4. Extract Audio from Blu-ray Discs
Finally, directly press the "Rip All" button and VideoByte BD-DVD Ripper will begin to rip audio from Blu-ray disc. You will get the extracted high-quality Blu-ray audio when the process ends.
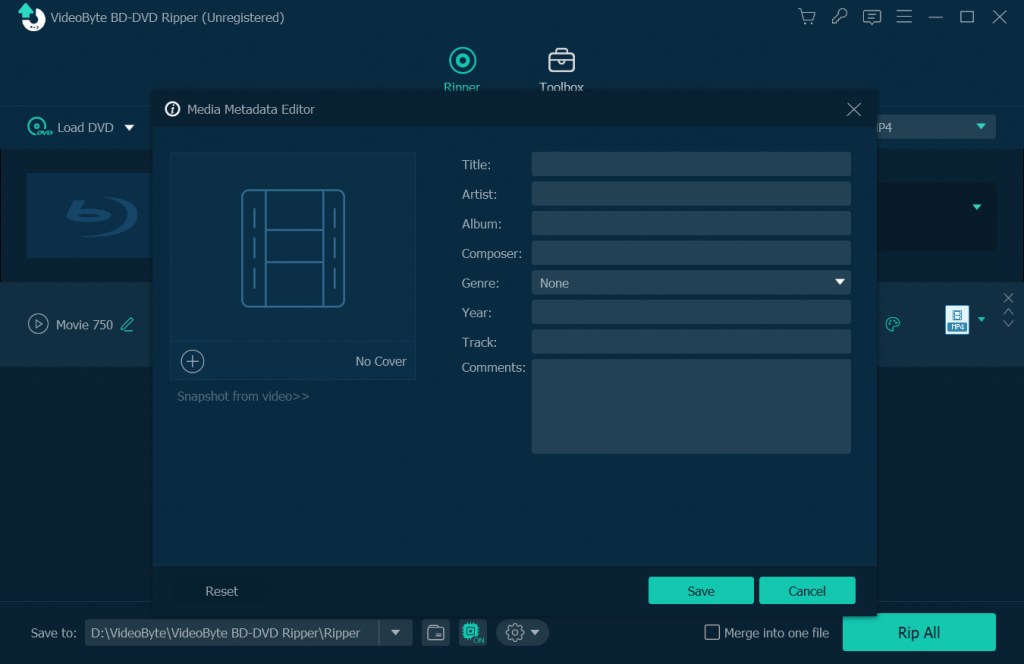
Tip: Manage Extracted Blu-ray Audio ID3 Tags
In order to help manage the extracted Blu-ray audios conveniently, VideoByte BD-DVD Ripper provides the "Metadata Editor" in its toolbox for freely editing the ID3 information of the ripped audio files so that they can be managed more easily. Simply import the audio files to the editor, and you can edit the ID3 information directly.
How to Extract Snippet Audio Tracks from Blu-ray Disc
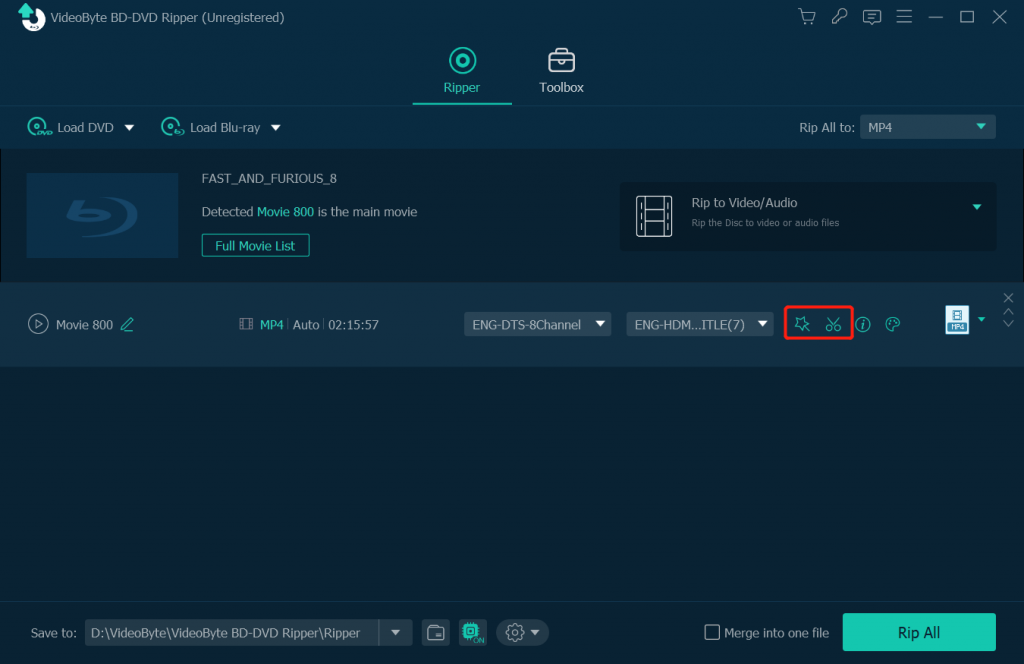
If you just need a selected part of Blu-ray disc and convert it to audio formats, just make full use of the editing features of VideoByte BD-DVD Ripper. It enables you to edit, rotate, add watermarks, add filters, etc. Go through the detailed steps to extract snippet audio tracks from blu-ray disc below:
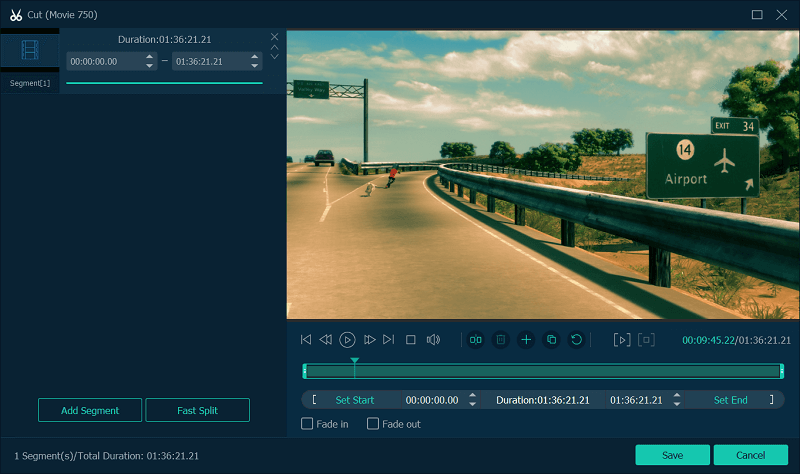
Firstly, install VideoByte BD-DVD Ripper and then import Blu-ray videos to the software. Once adding them successfully, you need to click the scissor icon to start cutting the movie.
Once entering the built-in editor, you can freely edit and adjust Blu-ray videos as well as its audio tracks in ways you like. Click “Save” when you complete editing it and you can continue the rest steps to rip Blu-ray aduios continuously.
Tips for the Best Audio Format to Extract Blu-ray Audio
To keep the extracted Blu-ray audio saved in the best quality, you would wonder what audio format can be the best option to extract audio from Blu-ray using a Blu-ray audio ripper.
Here are 4 options you can consider if you have no idea what formats to select to rip audio from high-fidelity Blu-ray.
- DTS:DTS is also known as DTS 5.1 or DTS surround, which can keep the theater-like audio quality for your Blu-ray audios but keep the files in smaller sizes.
- Dolby: Dolby is another lossless audio format which can keep original quality to make sure your extracted Blu-ray audio is saved in the best condition.
- FLAC:FLAC is also known as a lossless audio quality that can be used to keep Blu-ray audios at original quality, but with the size compressed at half of the original. Many users will select to rip Blu-ray audio to FLAC to keep good quality but in smaller file sizes.
- MP3: As MP3 is the most widely supported format by almost all devices and players, it can also be the best format to make sure the extracted Blu-ray audio files are played without limitations.
FAQs on Blu-ray Ripping
For those who still have questions or confusions about ripping Blu-ray, this part offers some frequently asked questions to help solve the problems. See if there are answers that can fix your confusion.
Will the Output Audio Quality Be Affected by Blu-ray Audio Ripping Software?
Generally, if you choose to rip music from Blu-ray discs using a professional Blu-ray ripper (such as VideoByte BD-DVD Ripper), the output audio quality will not be affected, because it will provide the lossless option to extract audio from Blu-ray. So in conclusion, the main solution to prevent the low-quality audio condition after ripping is to choose a reliable Blu-ray audio ripper to help.
Can I Rip Blu-ray audio to FLAC?
FLAC is a popular audio codec, which can save lossless music formats like WAV, ALAC, and APE. FLAC can save audio in half size smaller but keep the audio quality lossless. Therefore, people would consider extracting Blu-ray audio to FLAC in the first place, so that they can keep the Blu-ray audio offline in the best quality for listening later. Thanks to VideoByte BD-DVD Ripper, this can be realized because the program provides FLAC lossless format to rip Blu-ray to.
Some Blu-ray rippers such as MakeMKV would provide free service to rip Blu-ray audio to MKV format without the need to pay. But if you select a more professional Blu-ray audio ripper such as VideoByte BD-DVD Ripper, you still have to subscribe to the premium plan for enjoying higher-quality service and all selectable output formats.
I Need a Free Blu-ray Audio Ripper. Is There Any?
Some Blu-ray audio rippers freeware like MakeMKV, VLC and HandBrake may also be considered good choices for extracting audios from Blu-ray Discs with any cost. However, such free Blu-ray audio rippers may not support ripping all Blu-ray Discs, and moreover, they do not even offer audio formats output. MakeMKV can only create MKV format, and HandBrake mainly supports MP4 output.
So by comparison, VideoByte BD-DVD Ripper is better recommended for its wide support for ripping all Blu-ray Discs, and more importantly, its performance and great output quality can help you get Blu-ray audios extracted from the discs without affecting quality within a short time. Compared with those free Blu-ray audio rippers, this software is more reliable.
How to Rip Blu-ray Audio to FLAC?
Actually, as long as you own a versatile Blu-ray Audio Ripper such as VideoByte BD-DVD Ripper, you only need 3 steps to rip Blu-ray Audio to FLAC:
Step 1. Insert the Blu-ray disc to your PC and load the disc under a stable network connection.
Step 2. Customize the snippet or choose the entire Blu-ray disc.
Step 3. Choose FLAC as the output format and click “Rip All”.
Words in the End
Hot Articles