How to Rip Blu-ray on Mac with 4 Useful Ways [2024]
- By Karen Nelson
- 30/01/2024

BD-DVD Ripper
When Macs are not equipped with an internal hard drive, it becomes a bit troublesome to play Blu-ray on Mac. Therefore, instead of bringing an external Blu-ray player hardware everywhere, you probably wish for a way to rip and convert Blu-ray to digital on Mac, in order to have a more flexible Blu-ray playback experience on desktops without inserting a Blu-ray Disc anymore.
The post has collected 4 Blu-ray rippers for Mac, including both paid and free options to make things easier and faster! Now, scroll down to discover more details and select the best helper to rip Blu-rays in one-shot!
Summary:
Through weeks of testing, VideoByte BD-DVD Ripper definitely stands out with the fastest ripping speed, great stability, and original image. It can deal with batches of Blu-ray videos ripping at once to facilitate higher productivity! Skip to learn more details or freely install it to rip Blu-ray on Mac in no time!
Tools You'll Need to Rip Blu-ray on Mac
As mentioned, a Blu-ray ripper is a must if you want to rip a Blu-ray collection on Mac. On top of it, there are also some other essential preparations. Here are all of them you need to prepare in advance:
- Mac computer:. Make sure there is a network connection and sufficient storage space, usually 30GB and above.
- A Blu-ray hard drive: Apple has never officially provided Mac with a disc drive that supports Blu-rays. So, even if your Mac has an internal or external drive, you need to check if it supports Blu-ray playback, or you need to buy a new one;
- A reliable Blu-ray ripper:This is a must to successfully rip Blu-ray to Mac, and thus you need to choose a useful one.
Ensuring enough device storage and equipping your Mac with an external hard drive is not a big deal. But to select a reliable and workable Blu-ray ripper to rip Blu-ray Mac, you probably become aimless and don't know which one to choose.
Therefore, the following sections bring 4 different Mac Blu-ray rippers that can all help you rip a Blu-ray on Mac fastly and easily. Now, please keep reading and select your favorite option to try in no time.
Way 1. Rip Blu-ray on Mac with Professional Mac Blu-ray Ripper (Best Method)
The first and also the best Blu-ray ripping software for Mac we'd like to recommend is VideoByte BD-DVD Ripper. It is well compatible with all types of Blu-ray discs, files, and even folders, regardless they are encrypted by different Blu-ray protections or not. What's more, the program can retain original visual as well as mind-blowing sound effects while ripping 4K Blu-ray, to guarantee you a cinema-like Blu-ray movie streaming experience at home. The whole Blu-ray ripping procedure with VideoByte only requires a few clicks, and you just need to follow the simple guide to complete the task.
VideoByte BD-DVD Ripper allows you to edit the output profile freely. Apart from simply choosing an output format, you can adjust parameters like video/audio encoder, frame rate, bitrate, etc. to make the ripped Blu-ray movie match your Mac. By the way, you can also rip DVDs with the program in the same way of ripping Blu-ray discs!
VideoByte BD-DVD Ripper: Designed for Fast Blu-ray Ripping
- Rip Blu-ray Movie Collection -Strip Blu-ray media from discs and folders and rip to local files of 300+ digital formats.
- Convert Homemade and Commercial Blu-ray -Decrypt sophisticated Blu-ray protections to guarantee successful ripping of all Blu-ray discs/folders.
- Keep Stunning Video and Audio Quality -Retain original visual/sound effects to deal with 4K Blu-ray ripping without any quality loss.
- Fast & Smooth Ripping - Embed the advanced acceleration techniques to ensure ripping stability at 6X faster speed.
- Rip Blu-ray & DVD effortlessly -Compatible with both Blu-rays and DVDs to help you convert all discs to digital effectively.
Step-by-step Guide to Rip Blu-ray to Mac
Now, please view the tutorial guide and learn how to rip Blu-ray on Mac with VideoByte BD-DVD Ripper:
You can also walk through this step-by-step guide and follow the detailed introduction to rip Blu-ray to Mac effortlessly:
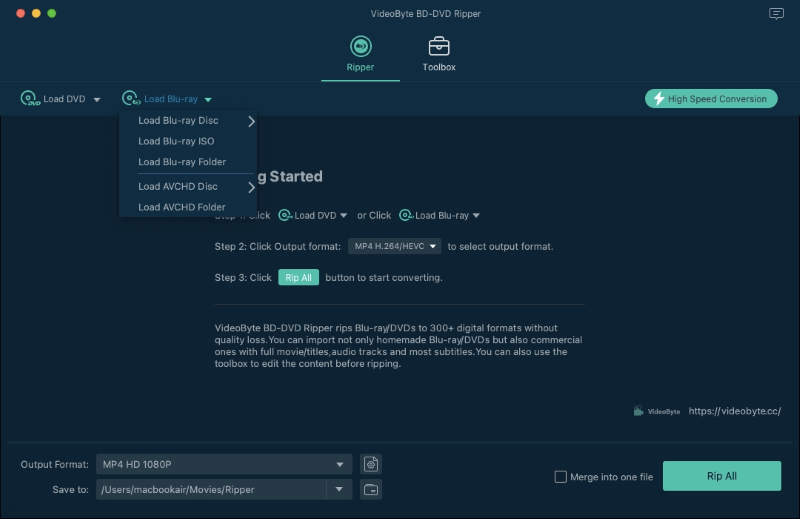
STEP 1. Firstly, you are required to connect the external Blu-ray hard drive to your Mac and insert the Blu-ray disc. Then, launch VideoByte BD-DVD Ripper and select "Load Blu-ray" > "Load Blu-ray Disc" to import the Blu-ray media to the software.
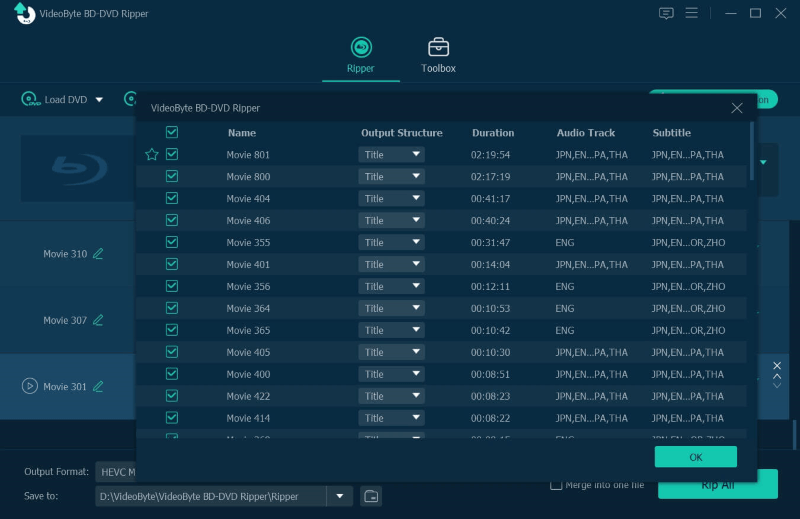
STEP 2. When the Blu-ray content is loaded, tap the "Full Movie List" to select the movie titles you desire to rip on Mac.
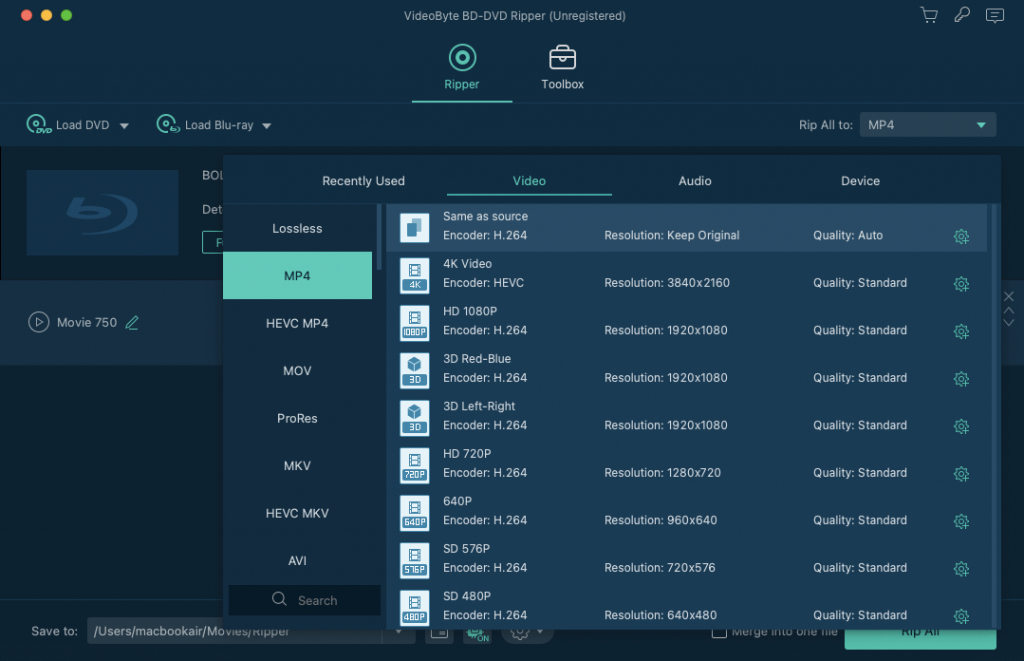
STEP 3. Now, go to the upper-right "Rip All to" drop-down menu and select the output format for ripping the Blu-ray disc. VideoByte BD-DVD Ripper has provided 300+ different format and resolution options for users to select as they need.
Tip: In terms of compatibility, MOV and MP4 are good choices for Mac. MKV is also recommended because it saves most Blu-ray content. And if you want to edit the profile like adjusting the video/audio encoder, you can click the gear icon on the right side of each output format option.
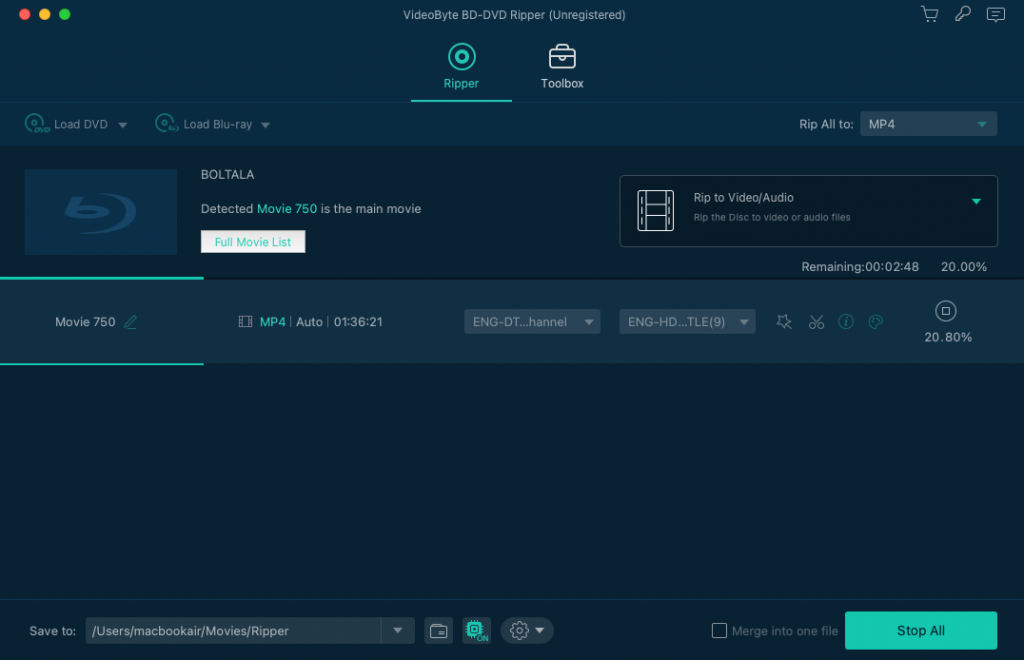
STEP 4. Process the Blu-ray ripping on Mac simply by tapping the "Rip All" icon. Then you just need to wait for the ripping to be completed patiently! It will finish within minutes.
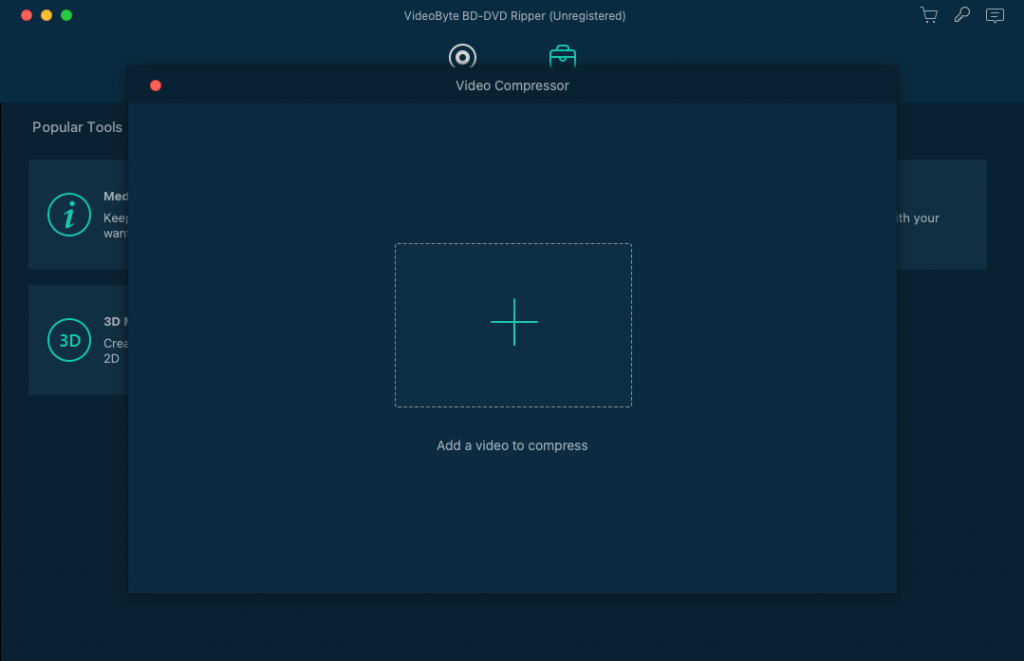
(Optional) STEP 5. Once you get the ripped video files but consider it a large size that takes up much of your Mac storage, you are able to navigate to "Toolbox" and use the video compressor to lower the video size. VideoByte BD-DVD Ripper will keep a good balance on quality and file size smartly, so you are able to get the files outputted in the best status without hassle!
Way 2. Rip Blu-ray on Mac with HandBrake
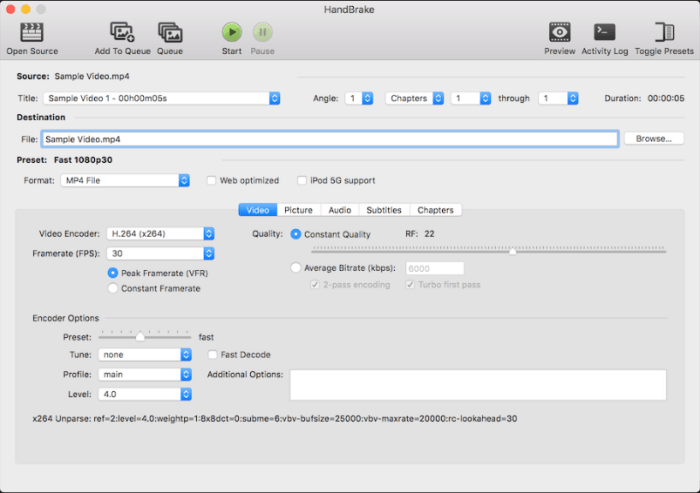
Another trustworthy Blu-ray ripper for Mac working to help rip Blu-ray on Mac can be Handbrake, which provides free functionality to rip homemade Blu-rays without copy-protections. Its optimal encoder settings will give you full customization to determine parameters to rip Blu-ray in preferences. With an intuitive interface design, HandBrake is appropriate even for beginners to get started, and it will maintain decent definitions to output ripped Blu-ray videos to deliver you a nice streaming experience offline.
However, the drawbacks of Handbrake should be its long ripping process, and it is not compatible with commercial or other types of encrypted Blu-ray discs (most on-sale Blu-ray discs are protected with various of copy protection techniques). It's hard to recognize the external drive, which is a great weakness for Mac. To deal with it, you have to download and launch VLC at least once to enable HandBrake to read your Blu-ray discs inserted in your external drive.
Tip: VideoByte BD-DVD Ripper can handle various copy protections and allows you to rip encrypted 4K Blu-ray to Mac in batches at 6X or even faster. If you are considering ripping all types of Blu-rays on Mac, try VideoByte.
Nevertheless, if you are a beginner and only get several homemade Blu-ray discs to rip, Handbrake is still recommended. Now, follow the procedures below to easily rip a Blu-ray collection on Mac freely in one shot:
STEP 1. Download HandBrake and VLC media player. Before you use HandBrake to rip a Blu-ray on Mac, just launch VLC first.
STEP 2. After you've opened VLC, you can just close it or leave it alone, and launch HandBrake. Then, choose your Blu-ray disc as the source.
Note: To ensure the normal performance, you also need to install .NET 6.0 Desktop Runtime for your Mac.
STEP 3. When HandBrake loads your Blu-ray successfully, you can adjust the output settings. You can check the column one by one and tune the parameters according to your needs.
STEP 4. When you finish the settings, click "Start" to begin ripping Blu-ray to Mac. After it's done, you can find the output Blu-ray movie file in the folder you've set. You can also check: How to Rip Blu-ray with Handbrake [Step-by-step Guide]
Way 3. Rip Blu-ray to Mac with MakeMKV
When HandBrake is only compatible with homemade Blu-ray ripping, if you wish to find another Blu-ray ripper for Mac working to deal with common copy protections for free, MakeMKV is also worth trying.
MakeMKV is designed to rip protected Blu-ray/DVD to MKV. With this tool, you can easily rip Blu-ray to Mac without quality loss, because MKV will ensure uncompressed quality to save ripped Blu-ray media for you.
However, you may notice that MakeMKV only supports MKV output. Therefore, you have no other choices, and some of your devices may not be compatible with MKV, which means you cannot transfer the Blu-rays to those devices to watch. And as MKV keeps the original data of Blu-ray discs to ensure the output quality, the output file can be really large that will occupy much Mac space. So, make sure your Mac has enough space to save the output video while using this free Blu-ray ripper for Mac.
MakeMKV VS VideoByte: Which is Right for Me?
VideoByte BD-DVD Ripper offers 300+ options to select and can compress file sizes to save your device storage. While MakeMKV only provides MKV which would take much storage space. So VideoByte BD-DVD Ripper outperfoms if you need to rip dozens of Blu-ray on Mac.
Then, let's see the simple guide on how to rip Blu-ray on Mac with MakeMKV:
STEP 1. Download and launch MakeMKV on Mac, and insert your Blu-ray disc into the drive.
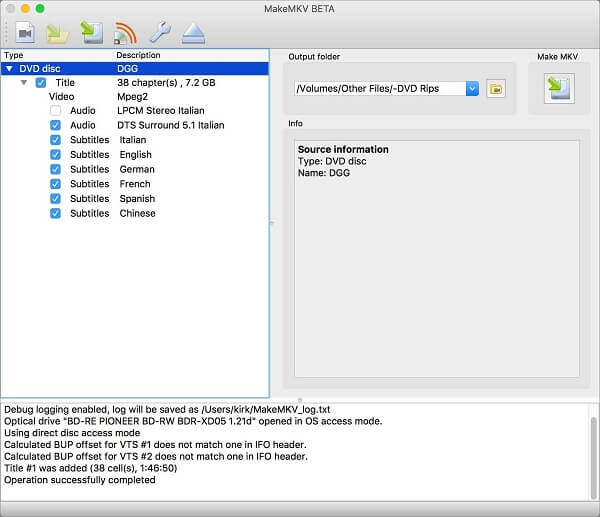
STEP 2. MakeMKV will load your Blu-ray disc for a while. Then, you will see a list of your Blu-ray movie content. Just select whichever part you want to rip.
STEP 3. Every title offers a drop-down arrow, and you can click it and choose the subtitle tracks you want to rip with. Then, just click "Make MKV" to start ripping. After it ends, you will find the file appears in the destination folder you select.
Way 4. Rip Blu-ray on Mac with VLC
You may still remember that we mentioned VLC media player in Way 2 when we are introducing HandBrake. Apart from helping HandBrake rip Blu-ray to Mac, VLC itself is also equipped with a built-in Mac Blu-ray ripper, which can handle Blu-ray ripping tasks on Mac for free, too. What's more, after you rip Blu-ray with VLC, you can directly play it with VLC smoothly, as VLC is mainly great media player software.
Although it can deal with some Blu-ray encryption methods, you have to add some plugins for the ripping procedure. Even if you've done this part, the plugins cannot handle some latest encryption either, and few customization settings are provided in VLC. According to some users, the success rate of successfully ripping Blu-rays in VLC was not that high, with frequent failures happening. In all, even if it works, the whole process can be much more complex compared to the above 3 methods, and the output quality cannot be ensured.
Keep reading the steps to rip a Blu-ray on Mac with VLC:
STEP 1. Download and install VLC media player. Then, prepare the keys database and AACS dynamic library to enable VLC to rip protected Blu-rays.
STEP 2. Download a supported Java JRE (JDK is NOT needed) and extract it into a 'java' folder in the VLC directory first. Then, install libaacs libraries and copy it into VLC directory root folder (the file 'aacs_info.exe' is not required).
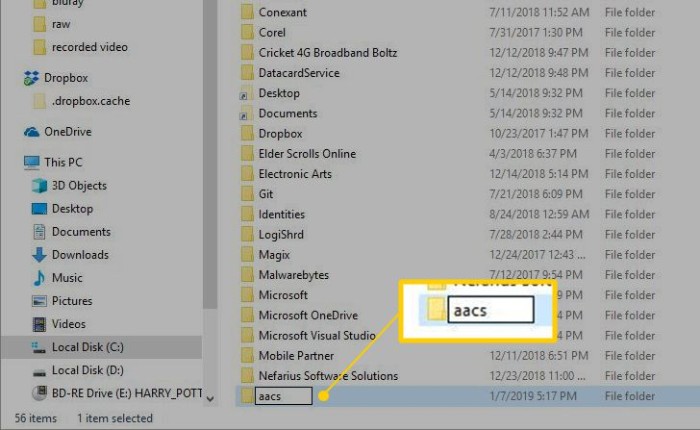
Then, download keys databse and unzip the keydb.cfg file which are needed for Blu-ray playback. You can find FindVUK - Synchronize.bat that can be seen as the simple version keydb.cfg file. As you are using Mac, please put the file in ~/Library/Preferences/aacs/. If you cannot find the folder, just create a new one.
STEP 3. AACS Dynamic Library is also needed. Download it on your Mac and move it to /usr/local/lib/ directory. Also create a new one if you don't find it.
STEP 4. Now it's time to rip Blu-ray on Mac with VLC. Insert your Blu-ray disc and open VLC, and click Media > Convert / Save... option.
Then, choose the Disc column, and select Blu-ray. Select the Blu-ray you want to rip, and click the Convert / Save button to begin ripping Blu-ray with VLC to Mac.
Upset by VLC's not working?
When VLC fails to deal with some Blu-ray encryption methods and doesn't work to help rip Blu-ray to Mac for you, try the best alternative, VideoByte BD-DVD Ripper. VideoByte can decrypt various Blu-ray encryptions, work at 6X faster, and rip every Blu-ray on Mac immediately. Get its 30-day free trial to start Blu-ray ripping for free!
Comparison of These 4 Ways of Ripping Blu-ray to Mac
After walking through all 4 easy ways to rip Blu-ray to Mac, here is a simple comparison among them to help you better sort out the most appropriate method for yourself to process Blu-ray ripping on Mac. Please check the chart below:
| Methods | Protected Blu-ray Discs | Output Formats | Ripping Speed | Customized Quality | Built-in Editor | Easy of Use |
| VideoByte BD-DVD Ripper | ✅ | 300+ formats | 6X faster | ✅ | ✅ | ✅ |
| HandBrake | ❌ | MP4, MKV | Fast | ✅ | ❌ | ✅ |
| MakeMKV | ✅ | MKV | Slow | ❌ | ❌ | ✅ |
| VLC | ✅ | 5+ formats | Medium | ❌ | ❌ | ❌ |
FAQs About Ripping Blu-ray on Mac
Is It Legal to Rip Blu-ray?
Referring to the legitimacy of Blu-ray ripping, it mainly depends on the local regulations. For example, in US and UK regions, ripping Blu-ray discs would be considered as illegal behavior, even if you have paid for them. However, later the governments also claimed that it is possible for people to rip Blu-ray discs for personal usage.
That means, if you rip the Blu-rays for more convenient playback or preservation by yourself, but not using them for commercial or other usages that would cause the loss of content creators, it is absolutely legal.
What's the Best Blu-ray Ripping Software for Mac?
With over 300 formats to export Blu-ray videos in lossless quality and 6X accelerated speed, VideoByte BD-DVD Ripper is definitely the best option to deliver you effortless assistance. From efficiency, output quality, and time-saving performance, the program delivers superior ability, and has accumulated a great reputation to be the best Mac Blu-ray ripper trusted by global users.
How to Transfer Ripped Blu-ray to iTunes on Mac?
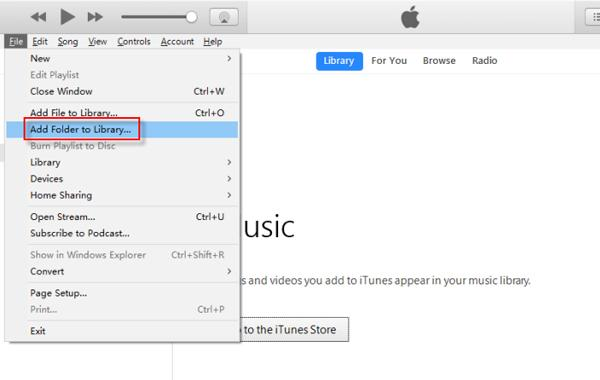
When you have ripped Blu-ray to iTunes supported media formats such as MP4, M4V, and MOV, you can import them to iTunes and store them in iTunes Library permanently. The procedures are as follows:
Step 1. Run iTunes on Mac.
Step 2. Click on the iTunes icon >> Add File to Library >> Add File/Folder to Library.
Step 3. Browse and select the ripped Blu-ray videos.
Step 4. Complete importing Blu-ray videos to iTunes for keeping on Mac.
Final Words
These 4 methods to rip Blu-ray on Mac are suitable for both users needing to rip commercial or homemade Blu-ray discs. But to rip all types of encrypted Blu-rays without restrictions at lossless quality, VideoByte BD-DVD Ripper delivers the most professional assistance and also functions at a really quick speed. Therefore, for those who want to rip Blu-ray on Mac effortlessly, VideoByte can be the most rational option you should try!
Hot Articles
